My pal’s bike seems to have some predilection for blowing the in tank fuel line off the pump. He’s on occasion 6 or so now – I would have long since sold the wretched thing (ah yes, actually I did with mine).
This time he has suggested that I would like to look at it. I’m well aware of all the talk of wrongly specced pipe in there and the like and I think we’re maybe beyond that. But a couple of questions before I go anywhere near it if I may;
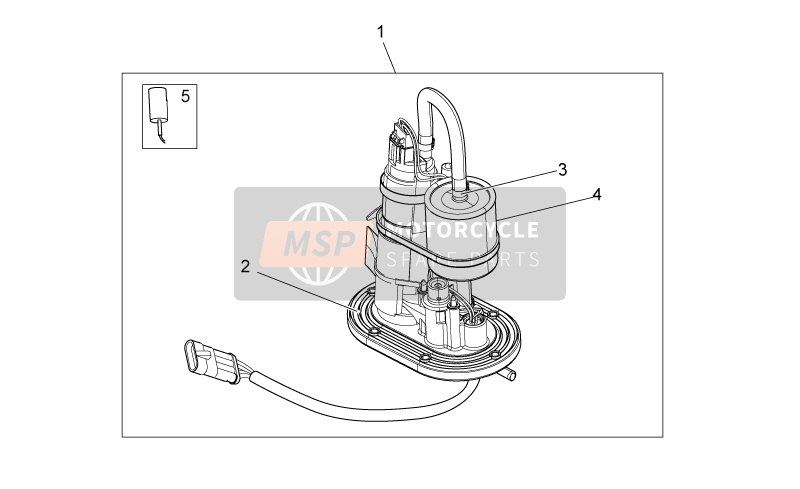
. Might I do well to pick up part GU03106170 before we start?
. Also I’ve heard one of the issues is that there is no bell end where the hose slides over. Might this be made of a material I could soft solder a copper ring around?
Thanks as always.
B
I think it’s plastic. I remember Delboy telling me he tied his up with wire to something, so it can’t slide off.
Rather than recover the bike it will be easier for me to go down there and dismount the tank to bring back to my gaff for attention. Is anyone able to advise on the tools I’d need to do this and an outline of what’s involved?
Thanks.
Well, faced with the vacuum of Phil Spector’s Wall of Silence I’ve been searching further afield in interweb land and found these top tips;
First of all disconnect the 4 way connector to the pump/gauge assembly.
Then try to start the engine. This will reduce the fuel pressure in the pipe.
Raise the back of the tank up a little and maybe put a block of wood under it to support it. (Fuel tank removal is always easier with an almost empty tank).
Then use a 12mm open ended spanner and place it between the grey collar and the red elbow.
Push the pipe towards the spanner then slowly push the spanner with the pipe slowly away from the elbow.
Slowly is the word, as there is a sealing O ring in the connector which is quite tight. If you get it right the pipe will just pop off the elbow.
Replacing, just push the pipe on to the elbow until it clicks.
The red elbow out of the pump is a little fragile so be careful.
https://www.youtube.com/watch?v=4SYAS5xsUlo
And from elsewhere;
Remove seat
Remove battery (two philip-head screws hold a bracket hidden under the top edge of the tank there)
Remove battery tray rubber (two lower bolts also holding the tank), & disconnect battery tray drain line
Remove tank vent lines from fittings (hidden behind the battery tray)
Remove front tank bolts
Unclip the electrical connector to the pump
Raise tank slightly to get to the fuel pump plug, and disconnect the fuel line connector.
The fuel line connector can be finicky as you’ve likely read here.
Push the fuel line towards the fitting while pulling back on the gray ring. It does not take much force and will pull easily off on most. Some are a bit of a pain, just be patient.
And also from the above and further, issues with the fuel connector being reluctant to release from the dodgy red plastic elbow are probably down to fuel pressure.
… if the quick disconnect doesn’t want to de-pressurising the fuel line by disconnecting the pump connector and then cycling the starter a few times can be of great assistance. Take care with the removal of the "Quick Disconnect’ as the elbow it fits on is NOT available as a separate part. (SB - From an older post – possibly/hopefully not true now).
I had this same prblem last month.
With the issue of the quick release elbow on the fuel pump, as i can be a bit ham fisted at times and didn’t want to break it, I removed the injectors at the other end of the fuel line. As for solving the pipe problem, I found that the 8 valve Grisso has a slightly different arrangment of the pipes making them shorter and easier to tie down. I have the diagrams but dont know how to post. 
Mine is running like this for a month now. No problems. I also used jubilee clips and " in fuel tank" fuel pipe which is much stronger than standard fuel pipe. Just remember to check fuel flow direction on the filter.
OK thanks for that.
I think it will be a month or more before I get time to look into it now. I’ll report back in due course.