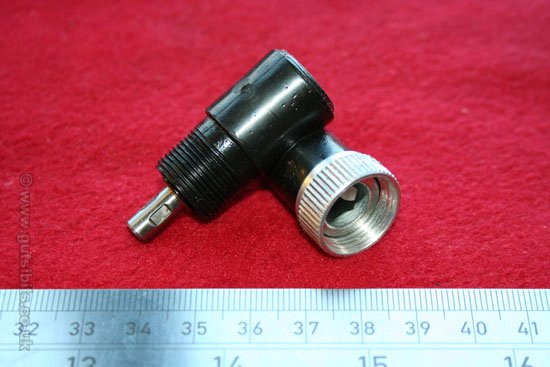
I noticed the speedo needle on my 1991 Le Mans V was bouncing around more than usual. So as I had the screen off for another job I thought I would take the opportunity to lube the speedo cable where it connects to the clocks. Having done this I went out on the bike and found that the speedo needle read correctly with very little flickering around.
I felt extremely smug. Until after a few minutes I glanced down and saw that the speedo had ceased to work altogether.
I’m assuming that the increased torque of the freshly lubed cable has stripped out the right angle gear drive at the back of the clock.
Anyone had this?
I’ve had one of the gearboxes fall to bits in the past. I replaced it with a used one off ebay and normal service was resumed.
My LM1 used to break cables at least once a year. They would take turns, speedo vs tacho. The cause was finally identified as rusting of the lower ends due to water getting in, because the rubber covers or boots weren’t doing their job. Taping around the ends with insulation tape then securing with a thin cable tie, to stop it unravelling, was a permanent cure.
The right-angle adaptors never went wrong as far as I can recall. Mind you I used to keep them greased.
EDIT: forgot to add, ‘needle bouncing around’ is normally a sign that the cable is snatching, or sticking, due to lack of lubrication (or rust!), or is partially broken and is about to break fully.
![]()
EDIT #2: you ‘assume’ your adaptor doesn’t work, have you tested it - just turn one end, does the other end turn?
Also, cable has to actually be fitting inside the drive square of the adaptor otherwise no it won’t turn.
![]()
Many thanks for the pointers gents - I’ll report back.
You were right Mike - inner cable snapped off about an inch from where it goes into the back of the clock.
Any tips for fitting the new inner? Sounds like you had plenty of practice!
While we’re in this speedo topic, does anyone have trouble with a seemingly jammed trip meter. Mine refuses to turn on the move or the turnkey. Is it a dismantle job?
I think I started off buying the inner, would have been from Motomecca in those days, had to choose correct length according to model. Later I got them from the bike shop over the road and he would cut to length and press a square onto the cut end. Not sure how he did it, think it was just a vice!
If you got an oiling can (thumb actuated plunger kind of thing), put a couple of squirts down the empty outer sleeve, well grease up the inner and slide it in. On mine the lower end of the sleeve had a - thing - can’t think of the right word - when the knurled nut is tightened on the gearbox, the ‘thing’ comresses and grips the sleeve. Can’t think what it’s called, it definitely has a name. (I’m hoping I’ll think of it in a minute.) Gland? Anyway, attach speed / tach end first, get the square located correctly, then ditto gearbox end, then tighten up the knurled nut. Sleeve and inner should be correct lengths then. The knurled nut included a captive rubber boot or sleeve, which was supposed to be snug against the sleve outer, but never was, so let water in. I taped up the end with insulation tape, then cable tied the tape to stop it coming undone. That kept the water out and the cables never rusted again.
![]()
Assuming it’s the old fashioned type - you can carefully prise off the bezel that attaches the glass. Two screws at the back of the housing anchor the innards. If you’re lucky a bit of WD40 might free it up, if not, something has broken … ![]()
The tricky bit is getting the bezel back on without it lookng like it’s been beaten up with a hammer, it’s very soft metal.
The word you’re looking for is an olive.
If you need a replacement, they are available from scooter supplies as Lambretta use a similar arrangement.
That’s the kiddie! Thank god for that was driving me nuts ![]()
Thanks Mike, I’ll give it a bash.
Thanks for all the advice dear chums. I bought a new inner and outer cable from Gutsibits.
I hatched a (for me) cunning plan to fit the new one.
I removed the old inner with the old cable in situ. I snipped the ferrule off the top off the old outer cable and cleaned oil and dirt off the end of the old outer with some brake cleaner on a clean rag. I then butted the top of the old outer to the bottom of the new cable and secured them together with a suitable size piece of shrink wrap with a bit of insulation tape wound around the join for good measure. I was then able feed the new cable through the path of the old one, pushing at the top while simultaneously gently pulling at the bottom. Once it was through I carefully cut the tape and shrink wrap off avoiding any damage to the new outer. I then completed the installation and applied shrink wrap at the bottom to keep water out.
