I would not be keen on friction. I understand these units are reliable, but seems a bit too much faith the the rotor is not positively locked. The manual suggests drop of Loctite, but this could potentially mean the rotor would never be able to be taken off, at least without risk of some damage to the rotor.
I am still awaiting the new kit to arrive so I might change my view once I have it up close and personal.
Fitted the plastic rotating part over 20yrs ago, no problem, old system failed fitted a new newtronics kit, left the old rotating part on, strobed it up… bang on (still no problem)
My set up is also Newtronic (plastic rotor) fitted in the 1980’s, admittedly the bike has been off the road for over 20 years but that was still 25 years without any issues, I am soon to see if it still works!
The supplied plastic rotor simply would not fit to the cam and notched section.
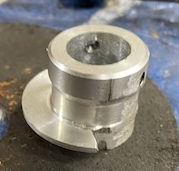
Anyway I have now made an aluminium rotor with two grubscrews to lock it. One of these coincides with the notch so this will completely locate and lock the rotor.
Took me a few hours, but I am pleased. I will adjust the plastic so it will fit, and will carry it as a spare on the bike.
Neat job, but if you lock the rotor to the notch , you won’t be able to adjust the timing without moving the distributor body, which defeats the point of having the adjustable rotor. Or am I missing something.
1 The segment has been machined to precisely match the profile of the original rotor. This is off centre a few mm. The photo is also slightly deceptive as the mill cutter produced a slight bevel, but up close it is at 90 degrees, after I dressed it with a file and removed the burrs.
2 I drilled the grub screws so one coincided with the slot at the indicated timing position. I will set it using the other grub screw, then will use the one in line with the slot as belt and braces.
That all said I have realised the supplied rotor is profiled to the shape of the cam. As such I can see that once affixed it can’t rotate out of position anyway. But the supplied one refuses to slide on no matter how well I align it, and I am loathe to take the dremel to it.
The plastic rotor has a reduced diameter where it passes over the top section of the distributor shaft and this acts as a stop for the rotor against the end of the cam section.
Anyway after 1/2 hour with a dremel the plastic rotor now fits perfectly. Indeed for now I am going to set it up with the plastic one.
However, is it just me or does anyone else have their distributor set 180 degrees out !
When I dismantled the top of the distributor I careful marked everything with a sharpie as I went, and then immediately engraved the base plate before it going in the ultrasonic cleaner. I thought it odd that the adjustable set of points was to the left side. Now I am re-assembling and setting up the timing it is obvious that whenever the engine was last out of the bike the distributor has been inserted with the shaft 180 degrees out.
As to remove and correct this requires the engine out, for now I am going to live with this anomaly.
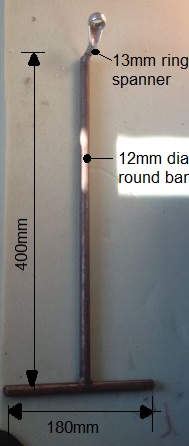
I have now also learnt how you prise a very tight rotor back of the shaft without damaging anything, including my knuckles !
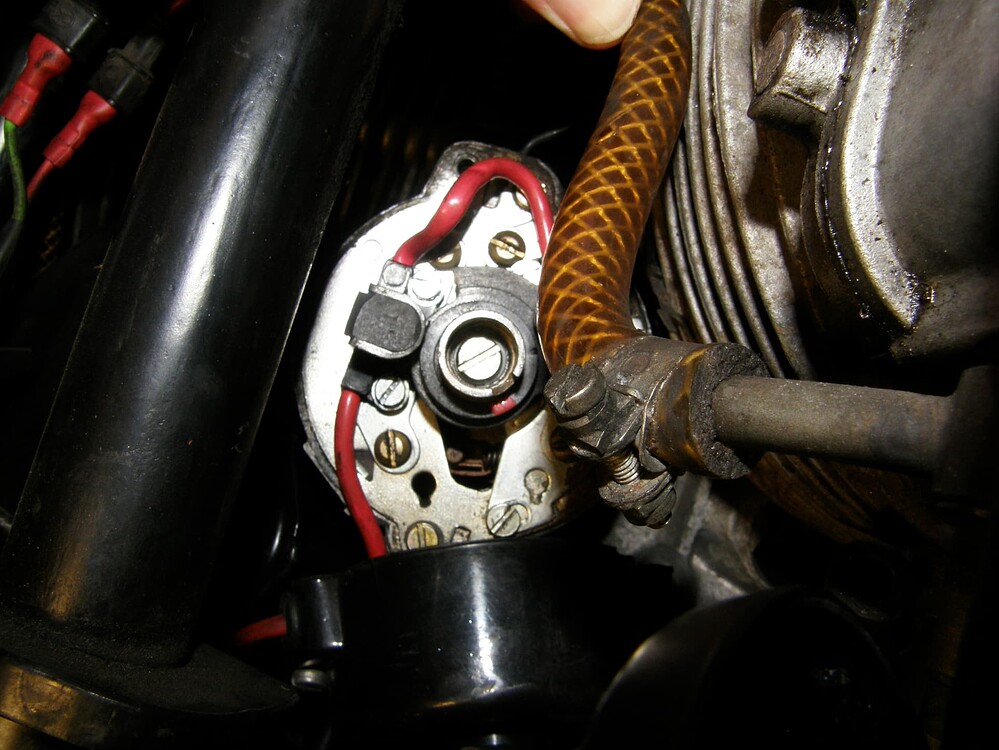
You can see the set up of mine in the photo above. The upper lights (the fixed ones) do the left cylinder and the lower ones (adjustable ) do the right hand cylinder.
The rotor turns clockwise and the left cylinder fires first.
Can your distributor not be removed and rotated 180 degrees to get it the other way around if you are bothered, alternatively if it works, then leave it as it is.
So a full set of oil changes, cleaned the sump and a new oil filter. The bottom end of the engine looks like new and no nasty surprises from the drainings. Had to helicoil two stripped threads holding the sump tray, but now all together.
So I set about following up the static timing with a dynamic measurement with the strobe.
I am assuming the advance starts by ~ 2000 rpm. With a rough idle ~ 1500 rpm I finally got the non advanced timing spot on, but not before opening up several adjustment slots on both new pickups, the static timing plate and even the baseplate itself.
But when I take the revs up to ~ 4000 the advance is to much. As a result the acceleration seems slow, so I am going to set the base midway between the first mark and TDC, and see if this improves the take up.
So now how to set the carbs, especially at idle. I wound in the idle mixture screw then back out 1.5 turns as per the manual, and then would in what I assume are the minimum throttle screws, but these made no real difference. There is no written setting for these - Help !
I did take the engine through all five gears and all spin properly with no noises, grunts or growls.
I have also now insured her so likely first road trip next weekend if the weather’s up for it.
I think in reality, the advance kicks in almost immediately the engine is running, hence the recommendation to make the final setting at full advance. This should be quite a way before the static marks.
For settting up the carbs, this is my proceedure, firstly balance the carbs. Wind the tickover adjusters well out. Then balance the carbs by listening to the slides dropping when you gently open and close the throttle. You should hear one click as the slides drop to the bottom together if they are both rising equally. Adjust the small cable adjusters on the lower end of the cables if one is closing before the other.
To set the mixture screws, (the smaller ones) start at 1 & half turns out and then wind them in and out to get the best running, you should hear the revs pick up and fall down as you adjust them. Leave it at the max revs.
The tickover screws (the larger ones) you screw in gently until you here the revs rise slightly. If correct, either one should be able to vary the tickover speed very slightly. To get the desired final tick over screw them both in or out together.
I have been thinking the advance mechanism is reliant upon the tension in the springs. After 45000 miles have the springs simply weakened and here not so able to resist the centrifugal force on the weights ? This would explain the over advancement of the mechanism.
Gutsibits are out of stock presently, but once they are available I don’t think a new pair will not do any harm.
So today I set the static timing mid way between the TDC and first advance mark. The engine seems a lot more responsive. The advance is stil a bit too much, so I will replace the springs shortly.
But I then attempted to fit the distributor cap cover, but found that due to the new position of the timing, the cover was fouling the right hand cylinder.
I had used the rotor supplied with the Newtronic kit, which had no adjustment on the cam. So I gave up and moved the distributor body back ~ 20 degrees and the affixed and set the rotor I had made. I have also engraved the set position for future reference.
Just a few more tidy up tasks and she will be ready for the road.