Stelvio 8v ntx ?abs suspension upgrades

I have a Stelvio 8v abs 2012 model 12500 miles, fitted with the 45 mm marzocchi forks.

I really love this bike, yes its heavy and has one failing - the handling and suspension set up is a real budget compromise. Its a difficult set up when you think there is 4 stone difference over the front end between a full and empty tank (32 litres).
Overall I have tried setting the suspension every which way, and found it to be ok but on the poorer side of OK, the front end is to vague and soft, but if wound up hard it becomes harsh, the rear shock likewise is sprung to fit in massive weight variations and so is a compromise, I always find the rebound very difficult to get right but its always seems OK.
I have recently opted to have my front forks rebuilt with Italian Andreani cartridges by the excellent and knowledgable Dave and Mark of Brook suspension in Bradford. I removed the forks and they arranged collection from home by UPS for £10.00.
At the moment (September) they are offering free fitting and set up with correct springs (to your own weight and riding style) so saving about £100 in labour costs. During fitting they found the fork oil to be degraded beyond serviceable use, they also found the bushes and guides to be scored. (the bike has a full Guzzi service history yet the fork oil has never been changed in 13000 mile. (Dave Brook said it needs done at 48 month intervals or 12000 mile whichever is the sooner.
Come on Moto Guzzi ! do the services correctly please.

I digress I got the rebuilt forks back with the old internals in the package (which are still as good as new if anyone wants to buy a set of original set up springs dampers , spacers and fork caps).

The Andreani are built with spring rates specific to the riders needs, and the amount of pre load, rebound and compression damping options is way beyond that of the original set up.

Having checked the steering head bearings cleaned and regreased them I fitted the forks and went for a ride.

I was shocked by the difference, I rode on numerous roads from A class with long sweepers to C class gravel and bumpy roads all i can say is it has transformed the bikes front end beyond all recognition.

Initially I rode a few mile on an empty tank and the bike felt better immediately better than it had felt before under any riding conditions (normally on the original set up its worst when empty very harsh rebound and very poor tracking over bumps) well there was none of that it simply floated over the bumps which i kept aiming for to see what happened. I also noticed that the bike seemed to steer and turn in far better than before.

I then filled the tank, thinking maybe this is where the suspension will need adjustment well having added 28 litres of fuel the bike felt better no compromise at all so I did a quick 40 mile circuit to test everything.

On smooth tarmac the bike felt so precise it was like on rails it tracked so well and allowed me lots of feel when cranked over on sweeping bends with none of the wallow i used to get. On quicker switchbacks side to side the bike didn’t get phased it just flicked side to side remaining completely composed almost like a very good sports bike.

So i headed for the bumpy stuff roads with smaller tighter bends, gravel and pot holes, on these roads the bike absorbed everything i could chuck at it floating over all but the most harsh surface changes while tracking perfectly and never seeming to get unsettled.

The bike feels lighter and more nimble simply because your no longer fighting all the bikes weight with poor suspension it just feels planted comfortable precise and absorbed almost everything thrown at it.

The very bad bit is the front end being so good since the rebuild has shown the back end to be very poor now its magnified the compromise of the original rear shock so this is now being replaced by a built to order (weight and riding style ) Nitron shock from Brook brothers. Again i will be selling the original if anyone wants one.

Following their advice this is the ideal way to make the Stelvio work as it should its a shame that Guzzi built such a good chassis the put budget suspension on it,(looks like they are going down the same road with the new 850tt to please the bean counters not the engineers).

The Nitron is due here in a few weeks time, I will get it fitted and clean and grease the swing arm bearings while I’m on once fitted I will give a further update.

Was this expensive - Yes the front end was £580 including the cartridge kits built to spec, new bushes seals, guides and oil return postage etc. The Nitron shock is an eye watering £700 notes so a lot of money, but it will last the life of the bike, like the front end is rebuildable serviceable and can be adjusted to suit other riders by some internal changes. Unlike the front end OE equipment which cannot be rebuilt once its worn out it needs replaced anyway and a rear shock rebuild would cost at least £130 plus and still be a compromise as it can’t really be adjusted beyond the oe spec.

I do think this work overall has started to transform the bike into something far better than left the factory can’t wait for the Nitron to arrive. :open_mouth:

Tchus Jake.

Suspension is the best upgrade you can get for any bike. I had it done on my fazer thou and the difference is unbelievable. So much so that at the first opportunity I upgraded my 1200 Breva. As you say it’s not cheap but well worth it. I had my forks rechromed to make sure the thin chrome didn’t pit in the near future.
It’s an expensive job to do it properly and I wouldn’t recommend anyone to penny pinch. Done correctly your bike will do everything it should and also, as I found in France, when you cock up it most certainly helps you out. So increases the safety factor. As I said worth every penny.

Cheers Robie I have to agree, I did a quick run around the Scottish borders today on all kinds of roads and its just a different bike that is without the rear end sorted yet, as you say it up’s the safety factor as the thing does what its meant to do and also stops it misbehaving if you have pushed it a little bit more than might be comfortable normally.
Another benefit is at very slow speed the Stelvio is like something 4 stone lighter all of a sudden - it just is so much easier to u turn or manoeuvre it feels much more balanced and composed, at higher speed it remains very composed even on the worst roads, The only problem it does lull you into going quite a bit quicker than before.

Tchus Jake.

That’s twins for you lol

A little update,

My Nitron Shock arrived , the shock is built to suit my weight with internal damping /spring etc built to suit me and the Stelvio .

I had it built for solo riding with remote adjuster to allow for luggage I don’t carry pillions any more.

It all looks very pretty, It was a bit fiddly to get the old shock out and this one fitted, while in there i checked cleaned and greased all the linkage bearings and bushes.
now with this fitted its taken a few miles of riding to dial it in on rebound settings to match the front upgrades just a bit fiddle with the damping settings and a reset of the front damping settings as the change at the rear altered the front end a bit.

All set up the bike is brilliant lovely smooth progressive suspension that floats over stuff very well. I don’t think the transformation is as big as when i did the front end, but still very noticeable and a better feel and the rear wheel doesn’t get in a flap over the bumpy stuff like it did before.

I think this has been the best upgrade overall I could have made to the bike as it has transformed the ride and handling. The bike is very responsive and flickable yet feels more planted than it ever has.

That done I’ve run out of money for the bike project - so lets hope those damn flat tappety things don’t decide to have a melt down.

Oh and on the point of when things get cocked up and all is going wrong, this happened on a roundabout last week when a driver in dolly daydream land decided to move from the stationary inside lane of a 4 lane roundabout into my lane very quickly, she pulled out in front of me at the last moment leaving no room to stop as i was leaned over a bit going right - around the roundabout, I was able to heave the bike over to hard left - no wobbles or weaves until my right crashbar connected and grated down her left door and wing, the bike had a small wobble at this point then recomposed itself and I was able to ride on to the exit road where I stopped. She failed to stop and drove off down a different exit. Me no damage except white paint on the crash bar. That said the bike stayed firm and controlled even though it took a side hit, I like to think the new suspension aided that control and kept the bikes stability far firmer even though i had flicked side to side then took a bit of a knock. Certainly raised the blood pressure and crimped me seat for a moment though.

All said and done I think the Stelvio is a stunningly superb bike overall, masses of torque and grunt, although heavy its very stable in all conditions and now handles like a sports bike.

Jake.

Being a tight bugger, I’ve never been able/willing to shell out for an aftermarket shock.

I’m happy with the 50mm Forks on my '09, all I’ve done is gone up an Oil weight to firm them up a little.
I suspect the 17" Griso front Wheel I fitted is a bit lighter than the 19" Spoked one, which will help as well.

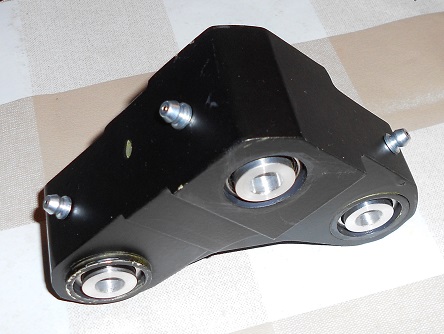
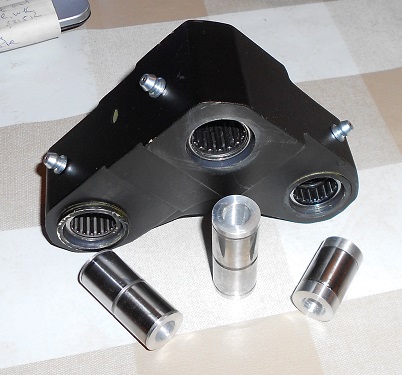
On the rear, I’ve fitted a BM* S1000R Shock.
It has separate Rebound and Compression adjusters.
It almost went straight in, but it’s approx 25mm longer than the standard one, so I had to make a new Linkage for it.
ShockLinkI.jpg
ShockLinkII.jpg

Lovely bit of work on the linkage there - good idea putting in the grease points as well - very nice.

My bike has the alloy wheels not the spokes and they are lighter. I used to be a wheel builder by trade till i retired last year and sold up the business - and always preferred spoked wheels on my bikes - but now the alloys are nice and easy to clean - I think I’ve done too much time cleaning and polishing rims and hubs during restorations, so will stick with the alloys.

mind you I do like these spoked wheels - that are made for the stelvio

https://www.bikehps.com/acatalog/info%5fKineo%5fSpoked%5fWheels%5fMoto%5fGuzzi%5fStelvio%5f1200%5f2008%5fonwards%2ehtml

That said they would be poor performers off road or on long trips where dirt, grit and debris can get in to the rim cylinders and simply wear them away. But very pretty all the same and i would say very very expensive.

I swapped my spoked wheels on my Stelvio for cast ones after I had a leakage at a spoke/rim junction. Looking at the cocktail of metals used at this junction and the dependence on a small O ring I decided to change. Corsa Italiana were selling the pair for £400.00 including hubs and I sold the (repaired under warranty) spoked wheels on eBay for £250.00. A no-brainer me thinks. how many other spoke seals would fail? How well would the various metals in the cocktail fizz away in a salt rich winter road soup?

Bye i think you sold them cheap at £250 wish I had known I might of had them off you at that price, a quick refurb and they would be a grand set of spares. Did you not think of running them with tubes - maybe - that said the alloys are very easy maintenance Ive got to agree.

I was more worried about the range of metals rims/spokes/spoke nuts and the air is kept in by an O ring in the middle of that potential galvanic sandwich. Bad design in my book. I am happy with the wheels I have now and they cost me £150 to change!

Now I too have to address the bearings in the rear shock linkage, the MOT just gave me an advisory that there is play in the linkage, so new bearings will be required soon :unamused:

I agree Chris Im not so keen on the design, If your going tubeless design a rim to do the job correctly, the solution was more complex than it should have been with many fail areas.
Do you by any chance feel the bike to be more sure footed on the alloy wheels, they are lighter and obviously have no flex unlike a spoked wheel so should have altered the feel of the bike a small amount I would have thought.

Jake.

Hello Jake, a good point but one that I have not really noticed. The bike is usually quite well loaded and often two-up with luggage, (my pillion does not like me hanging off on corners or exploring the limits of adhesion) But I think the peace of mind is the main factor to me. How Guzzi can design the wheel/spoke junction with three different metals and then rely on an ‘O’ ring to keep the air in beats me, maybe they think salt is only applied to pasta and not tarmac?

I am glad you revived this thread as it has saved me searching for it. At the MOT in March the tester said that there was a little play in the rear suspension and that the bearings would need replacement soon. I like the addition of grease nipples, to me that is a worthwhile addition, as I hope to keep this bike for at least another 20,000 miles (yes that is all it has done in 8 years from new) I will look at doing similar. I need to get the 950s of the workbench and take the rear end apart…

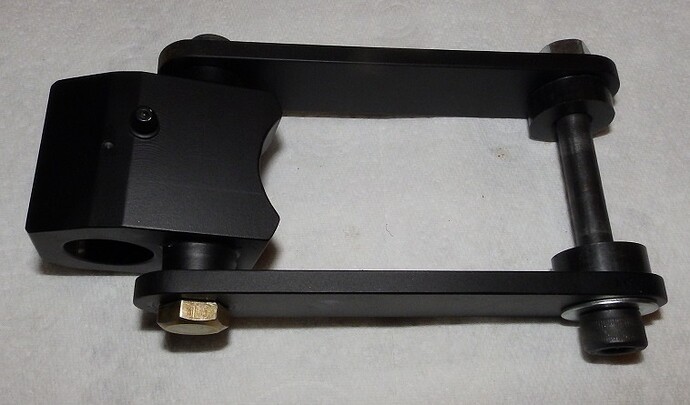
I’ve made my own version of the ‘Tuning Fork’ Link now.
The ‘Dogbone’ one I made previously (to fit the S1000R Shock) lowered the rear a touch, so I made the Link a little shorter, to lift the rear back to where it should be.
Link1.jpg

Lovely work chris very impressed.

Doc, as I noted above I need to change the bearings on the rear shock linkage, how easy are they to get off and swap? Did you machine the grease nipple holes yourself or send out and did you machine the slot in the pivots or iare they already there? This is something I need to do but whilst its apart I fancy butting the grease nipples in.

Many thanks

Apologies for the delay Chris, not been on here for a while.

You’ll need some sort of press to do the Needle Rollers.
If you clout them out/in with a hammer and drift, even an Aluminium one, you can deform the Casing of the Bearing.
You can do it with a large Vice, but it’ll need to have a Jaw opening of around 5", maybe a little more.

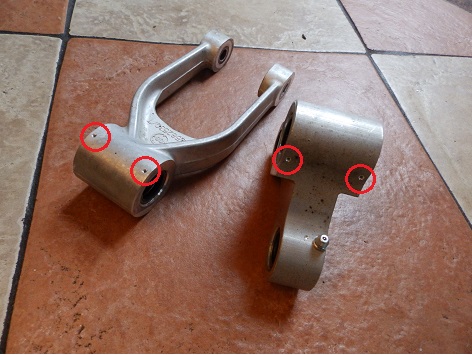
I use Knock-in Nipples for the Links, you drill a small hole (1.5mm or so) right through where you want the Grease delivered (between the Bearings where there are two side-by-side, or between the Bearing and the Seal where there’s one).
Then open up the Hole to the correct size for an interference fit with the Nipple.
https://www.ebay.co.uk/i/200867271206?chn=ps&norover=1&mkevt=1&mkrid=710-134428-41853-0&mkcid=2&itemid=200867271206&targetid=908661474856&device=c&mktype=pla&googleloc=1006584&poi=&campaignid=10195651586&mkgroupid=107296210212&rlsatarget=pla-908661474856&abcId=1145987&merchantid=7464024&gclid=CjwKCAjw57b3BRBlEiwA1ImytgnPyA2wsr23_E-a30rCuYl_Way7rmwtV96f4MXVTTeZxxIIIg4AMBoCpqkQAvD_BwE
You need to think about where the Nipple will sit as well, no good having it where it can’t be reached once it’s all assembled.

You also need exit holes for the old dirty Grease to get out.
Linkage1.jpg
If you just pump fresh Grease in without anywhere for the old stuff to go, you’ll blow the Seals out.
you want to place them as far away from the Nipple as possible, diagonally opposite, so the Fresh Grease covers as much of the Bearing Rollers as possible.
The Grease in each exit hole dries to form an effective Plug, keeping water/dirt out.

. . . did you machine the slot in the pivots . . .

Not sure what you’re asking there Chris.