I’m about to order new pads, brake Pistons and overhaul kit for the right front brake on my T3. Not even bled brakes before so full of dread. Any advice, warning or encouragement would be welcome, even what type of bleeding kit to buy. This is all new to me but I want to have a go, even if in a week from now I’m taking it in a van to haywards. Cheers Dougie.
Unless the pistons are stuck in then it all comes apart easy enough.
Reassembly using the supplied grease is also easy.
Just follow the instructions and basic common sense.
Bleeding brakes is personal.
I suck the fluid through using a large syringe.
Thanks for that I didn’t even realise the kit comes with instructions. Still waiting for gutsibits to ring back, but as the job progresses I may have to post with specific questions. I’m starting with the right front as the bike came with just that on the front and the left disc and calliper etc in a carrier bag, don’t know why but a job for the winter when I’ve got more time/ confidence. Cheers Dougie.
The first one I did I took my time and it took 30 minutes.
I then breezed through the other two.
That was on a 20 year old Mk111.
You shouldn’t have any problems.
I’m not married so I did mine in the comfort of my living room.
if the calipier is in working order remove the brake pads and pump the lever a few times, this will hopefully push the brake pistons forward a little and so make it easy to remove the pistons.
if you are doing the front brake calipier it will make sense to do the front handlebar mounted master cyclinder,
the master cyclinder will need a small 3mm rod to be inserted into the small end of the cyclinder, I have used a Allen key to show how its done but a straight edged rod will be better ,place a bag over the larger end to catch the spring, and seals etc which will come out.and take note of the order in which they came out, take a picture if possible, do not use a small rod with a poined end as that could dig itself into the piston[URL=http://s260.photobucket.com/user/aaa999777/media/Mobile%20Uploads/cyclinder%201_3.jpg.html]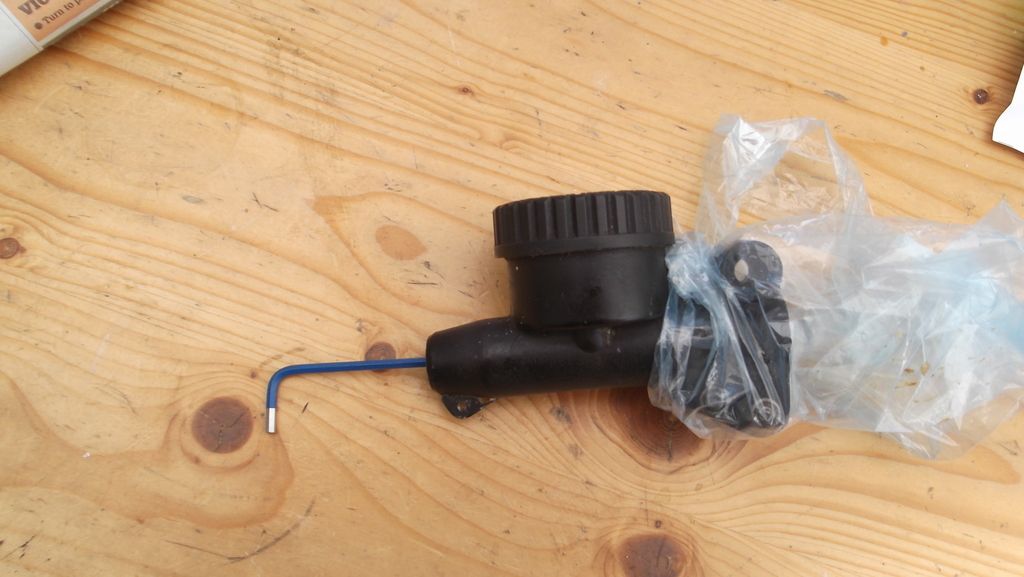 [/url]
when the seal and piston etc are placed back into the cyclinder use a thin walled 14mm deep socket to push them all back into the inner, a tap with a small hammer might be needed.[URL=http://s260.photobucket.com/user/aaa999777/media/Mobile%20Uploads/cyclind%202_1.jpg.html]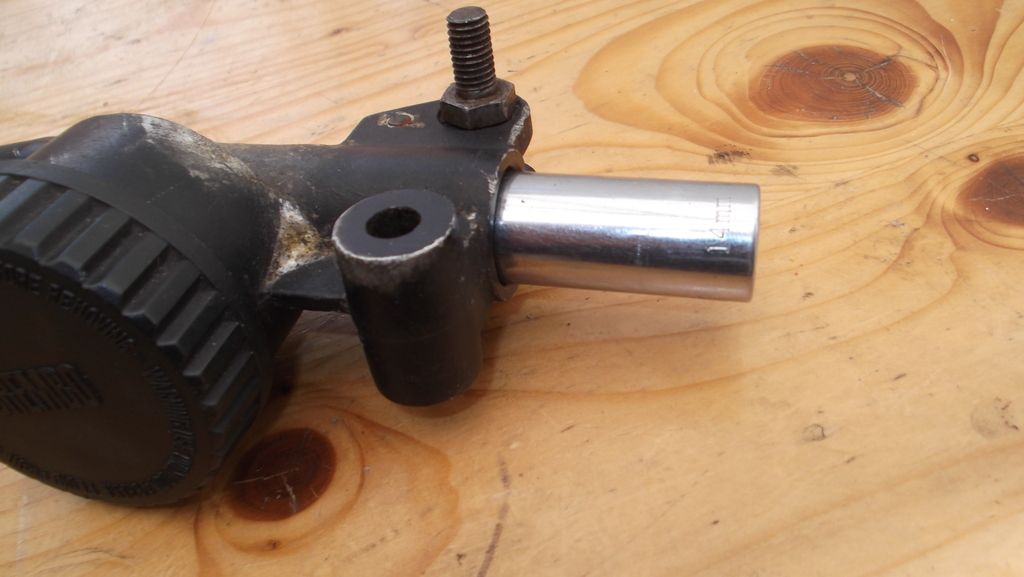 [/url]
Thanks for that , I’d completely overlooked the handlebar end of things, I’ve spent all morning staring at the caliper working up the courage. I assume you mean to replace the seals in the cylinder? Is it ok to clean the caliper inside and out with white spirit or is there a better product. The Haynes manual says use hydraulic fluid. Im not even sure what that is. Cheers. Dougie.
Before you attack the handlebar master cyclinder check the overhaul kits are still available, the original master cyclinder fitted to a front handlebar T3 was the P15, but as T3’s are now 30+ years old you would need to check just what is fitted, odds are it will be a P15
I use a spray can of brake cleaner to clean the inners, or brake fluid
when you do strip the calipier dont forget to fit the small ‘O’ ring between the two halves when putting it all back, it is easy just take your time and keep it all clean.
if the brake hose is old it might be worth fitting a new one.
the two halves of the calipier are held together by two big’ish allen bolts, think they need a 8mm allen key, before you remove the calipier from the brake disc just loosen off these two bolts, it is easier to loosen off these bolts whilst still on the disc than on a work bench. but dont do it before pumping the handlebar lever in order to loosen up the pistons. or air will get into the system…
so to recap,
1- remove brake pads
2-pump handlebar lever to push brake pistons out as far as possible,
3-before removing calipier from forks loosen off the two big inner bolts ,
4-split the two halves of the calipier and remove seals and pistons, take note of where the small ‘O’ ring fits
5-clean it all up, brake cleaner or whatever
6-fit new seals and pistons,brake pads
7-fit small ‘o’ ring into its recess and carefully bolt the two halves together, making sure the ‘O’ ring has not moved,
8- fit calipier back on bike, making sure the two middle bolts (see3 ) are tight
9- fill master cyclinder with brake fluids ( if you are not renewing the master cyclinder seals etc) and leave for as long as possible.
10- bled the system, easy on paper is it not?.
Overhaul kit for P8 caliper will include new rubber dust covers that surround the pistons, also a sachet of grease, this grease is applied liberally to circumference of pistons before putting the (new) dust covers on.
I hope the new pistons are the teflon coated alloy ones, not plain steel. Also better check the other calipers as well as to whether the pistons are plain steel, if so I would get new alloy pistons for those too. Is what I had to do when they seized up.
Thanks for all the tips especially the step by step list ,. Â I realise now that when haynes say clean with hydraulic fluid, they mean brake fluid. as soon as the parts arrive, im on it. Cheers Dougie.Â
I have fitted new pistons and pads but I can’t seem to bleed the brakes and noticed a fine stream of bubbles rising from the master cylinder when the lever is pumped. I’ve ordered a cylinder service kit in desperation. This should have been a simple job but the holes getting bigger, Â I may need a bigger shovel.
You are by no means the first.
Try back-bleeding with a syringe, i.e. pushing it into bleed nipple then filling up to reservoir.
Don’t worry it will all sort out.
If the front brake the easiest way to bleed it is to hold the lever open overnight with a grip tie.
Release it next day then pump the lever till the pads are in place.
With the linked system use a syringue as stated.
Front first, then the rear, then the front again.
Sorry, another quick question. Â Can the master cylinder be serviced still on the handlebar? Just taking the lever off and the brake line connection. The pictures that were kindly sent to me show the cylinder off the bike, as does the link on the gutsibits site. The kit should be here tomorrow and I’m keen to get it working for the weekend. Cheers Dougie.
You need to hammer out the old piston with a 3 or 4mm (can’t remember which) steel rod inserted up the outlet end, where the banjo bolt goes in. Dunno if that can be done in situ I have taken it off and supported it in a vice when I did it.Â
Also if done on handlebars risk getting brake fluid on any nearby painted bits.Â
Â
it is better to remove the whole cyclinder off the h/bars,yes that might mean removing the twist grip etc but when you use a socket to tap in all the seals etc due to the shape of the master cyclinder it will be much easlier to do the job with the master cyclinder off the bike,
one point, I did mention using a 14 mm thin walled socket to tap in all the seals etc but that was on a linked master cyclinder (behind r/h side panel) the front right hand side master cyclinder will need a 13mm thin walled socket.
Or a suitable bit of steel tubing.Â
Â
Front brake finally working, one of the new stainless steel nipples was letting air in even when it was only open a flat. Put the old one back in and that leaked as well, must be a worn thread in the caliper itself. I’m bedding the pads in slowly but already feel tons better. Big thanks for all the help and encouragement I’ve had. Cheers. Dougie.
It’s not the screw thread that keeps the fluid in, it’s the pointy bottom end of the nipple making a seal with the small bleed hole in the bottom of the caliper’s threaded hole. Sounds like the SS nipple may have damaged this bleed hole so now it won’t seal even with the original nipple? Because it doesn’t fit properly?
I was once considering fitting SS bleed nipples…